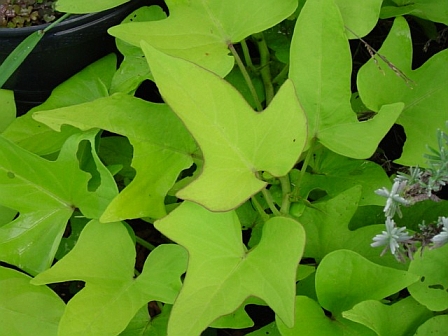
Some time ago I saw a beautiful flowering vine growing up a trellis and wondered what it was? Here’s a photo, can you take a guess?
Sweet potato! It’s easy to grow in a hanging basket if you have limited space. You can also cook up the leaves. Sweet potato greens with garlic and soy sauce is common in Taiwanese cuisine.
According to Wikipedia, “Sweet potatoes are native to the tropical parts of South America, and were domesticated there at least 5000 years ago.
The genus Ipomoea that contains the sweet potato also includes several garden flowers called morning glories, though that term is not usually extended to Ipomoea batatas.
Besides simple starches, sweet potatoes are rich in complex carbohydrates, dietary fiber, beta carotene (a vitamin A equivalent nutrient), vitamin C, and vitamin B6. Pink and yellow varieties are high in carotene, the precursor of vitamin A.”
I came across this great article How to Plant and Grow Sweet Potatoes. Here’s an excerpt of the article. See the rest at the link above.
Step 1: Start the Slips
Sweet potatoes aren’t started by seed like most other vegetables, they’re started from slips. Slips are shoots that are grown from a mature sweet potato. You can order slips from a mail order or Internet catalog or you can start slips from a sweet potato you bought at the store or one from your garden. If you buy a potato from the store, be sure to find out if you’re getting a bush type or a vining type.
To start your slips, you need several healthy, clean sweet potatoes. Each sweet potato can produce up to 50 slip sprouts. To create sprouts, carefully wash your potatoes and cut them either in half or in large sections. Place each section in a jar or glass of water with half of the potato below the water and half above. Use toothpicks to hold the potato in place.
The slips need warmth, so put them on a window ledge or on top of a radiator. In a few weeks your potatoes will be covered with leafy sprouts on top and roots on the bottom.


Step 2: Root the Slips
Once your sweet potatoes have sprouted, you have to separate them into plantable slips. To do this, you take each sprout and carefully twist it off of the sweet potato. Take each sprout and lay it in a shallow bowl with the bottom half of the stem submerged in water and the leaves hanging out over the rim of the bowl. Within a few days roots will emerge from the bottom of each new plant. When the roots are about an inch long the new slips are ready to plant. To keep your slips healthy be sure to keep the water fresh and discard any slip that isn’t producing roots or looks like it’s wilting.


What a cool article! Thank you for the tutorial. I’ve always appreciated the beauty of the shape of sweet potato leaves, but didn’t realize they were edible.
Great tips on a practical way to start sweet potato vine. I popped over to your blog via the WGardener listserv email, and I just wanted to mention that I think it’s so cool that you’ve traveled the world wide & far and have such gorgeous photos to boot! I’ve also been to almost 30 countries, and I hope you’ll blog more about both gardening and travel because these both are 2 big loves of mine.
This is a wonderful posting for the Spring planting; and I noticed the leaves immediately 🙂
It can also be noted that the vines can be planted directly (in a large mound/heap of soil) and they will generate plenty of sweet potatoes in about 8-9 months.
Also, the orange sweet potato is much richer in beta carotene than white sweet potato.
Enjoy!
Great photos! Nice and clear, helps us “visual” folks. I’m ready to try it out and see if I can sell some vines next year!